The trims in your home might not seem to have a significant effect on the aesthetic appeal of your room, but they can actually add a decorative factor to your interiors.
While some recommend painting the trims before the walls because you can tape and protect them, this approach can actually be messier and more hassle. So if you choose to paint the trim after painting your walls and ceiling, but don’t know how to get it done perfectly, read on.
Step-by-Step Guide on How to Paint Trims
If this is your first time painting trims or you simply want to know how professional painters do it to do a better job at it, follow this simple step-by-step guide.
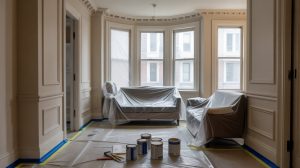
Step 1: Prepare the area.
The first step is preparation. You can do this by removing or at least covering the surrounding furniture near the woodwork. Use an old bed sheet or a dustsheet to cover your furniture and floors.
It’s also recommended to use masking or frog tape between the trims and the walls and floors it runs up to in order to avoid messing up the painted walls. If you don’t want to tape off the trims, it’s highly recommended to use a high-quality brush and carefully paint them with a steady hand.
Step 2: Sand down the trims.
We know it’s tempting to skip this step, but this will actually help the primer and paint stick well to the surface and lets you achieve a smooth finish.
You can use 120-grit sandpaper if the woodwork is already smooth and 80-grit sandpaper if it’s coarse. Once you’re done sanding, clean it up with a cloth.
Step 3: Fill the cracks and dents with wood filler.
Screw holes and dents should be filled with wood filler before the cracks between the wall and woodwork are caulked and left to dry.
Step 4: Sand the surface again.
Sand the trims again lightly using 120-grit sandpaper to smoothen the surfaces.
Step 5: Prime the trims.
The key to a professional-looking finish is the primer. Use a wood primer and apply it to the woodwork using a high-quality paintbrush of the appropriate thickness.
Depending on what product you use, you may not have to apply a separate undercoat. Using a primer will ensure that your topcoat has an excellent surface to adhere to and will make the trims look crisp.
Applying primer is a crucial step, especially if you’re painting over dark trim. Depending on how dark it is, you might also want to apply two coats of primer before applying the topcoat.
Step 6: Apply the final topcoat.
Once your primer/undercoats are fully dry, you can apply the final topcoat. Work with the grain of the wood, and depending on how many coats of primer or undercoat you used, you may only need to apply one coat.
Choose a paint that is specifically made for trims. A good option is an oil-based enriched semi-gloss enamel that can create a durable finish that is easy to clean and maintain.
Tips for Painting the Trims Neatly
Painting trims can be tricky for the inexperienced. So here are some effective tips for painting the trims like a pro:
- The most basic piece of advice is to use a paintbrush that is specifically made for trims to ensure a neat finish.
- Just like when painting walls, cut in edges for greater precision.
- Avoid overloading your paintbrush. Remove excess paint using the slap technique instead of just wiping it as this only pushes the paint to the center of the paintbrush, causing drips.
- Don’t overlap to avoid uneven marks, and don’t work in the paint too much.
- With each brushstroke, begin in an unpainted section but work in towards painted areas, ensuring that you brush off with each stroke so the paint will be applied neatly.
- Don’t brush across an edge to avoid paint drips, and paint towards or along edges to prevent buildup.
- You can use a small high-density foam paint roller to make the job quicker, but will most likely still need a paintbrush for touchups.
- When repainting trims, start by evaluating the condition of the existing paint. If the surface is peeling badly, you should use a paint stripper and solution or heat gun to remove the paint. Otherwise, you don’t need to remove all of the existing paint. Light sanding may be enough to create a nice surface for the new paint to stick to.
- You can paint over painted trim. However, if the trim was painted in a dark color, priming should not be skipped.
Let the Experts Handle Your Home Painting Project
Painting your house might sound like a fun, DIY home improvement project. However, take note that this requires patience, skill, and patience, especially when working on the trims.
If you don’t want to go through all the hassle, get in touch with the Soho Painters team today to learn more about they can help you. Aside from residential and commercial painting, they also offer wallpapering services.