TL;DR: Prepping walls for painting means cleaning the surface, repairing holes and cracks, sanding rough spots, and priming before you roll on any color. Skipping these steps is the single biggest reason paint jobs fail early. Good prep takes more time than the actual painting, but it’s what separates a finish that lasts five to ten years from one that peels within months.
Proper wall prep involves four main steps: clean, repair, sand, and prime. Most rooms take two to four hours of prep work before painting can start, and that time pays for itself many times over in how long the final coat holds up.
The thing is, most painting guides make this sound simpler than it really is. The condition of your walls, what type of surface you’re working with, and what’s already on them all change how you should approach prep. Below, we’ll walk through the full process step by step, cover the differences between prepping plaster and drywall, and share the mistakes we see most often when we repaint apartments that were done incorrectly the first time.
Why Wall Prep Matters More Than the Paint Itself
We’ve repainted apartments in Manhattan, Brooklyn, and Queens where the previous paint job was less than a year old and already failing. Bubbling near the ceiling. Peeling around window frames. Cracking along patched areas. In almost every case, the paint itself was fine. The prep work was the problem.
Paint needs a clean, stable surface to bond to. When you skip cleaning, dust and grease create a barrier between the wall and the paint. When you skip repairs, cracks telegraph through and get worse. When you skip sanding, glossy surfaces reject new coats. And when you skip priming, you get uneven color and poor adhesion.
Think of it this way: paint is only as strong as what’s underneath it. A $70 gallon of Benjamin Moore on an unprepped wall will look worse than a $30 gallon on a wall that was properly cleaned, patched, sanded, and primed.
What Tools and Materials Do You Need to Prep Walls?
You’ll need a few basic supplies before you start: a bucket, sponge, mild dish soap or TSP (trisodium phosphate), a putty knife, lightweight spackle, sandpaper in 120 and 150 grit, a sanding block, painter’s tape, drop cloths, and a quality primer. For larger repairs, you may also need mesh tape, setting-type joint compound, and a 6-inch drywall knife.
The right grit sandpaper makes a noticeable difference in your results. For most wall prep, 120 to 150 grit is the sweet spot. It’s fine enough to smooth patches without gouging the wall, and rough enough to degloss shiny surfaces so new paint grips properly.
Don’t overlook drop cloths. Canvas is better than plastic because it stays put and absorbs drips instead of letting them pool. Plastic sheeting works for covering furniture, but on floors it gets slippery fast.
The Step-by-Step Wall Prep Process
Clear and Protect the Room
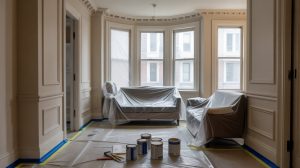
Start by removing everything you can from the room. Take down curtains, wall art, and shelving. Move furniture to the center and cover it with plastic sheeting. Lay canvas drop cloths over the entire floor area, taping the edges down so they don’t shift.
Remove all outlet covers and light switch plates. Put the screws in a small bag and tape it to the back of each plate so nothing gets lost. If you’re working around ceiling fixtures, either remove them or wrap them tightly with plastic and painter’s tape.
Clean the Walls
This is the step almost everyone skips, and it’s one of the most important. Walls collect dust, cobwebs, cooking grease, and body oils over time. All of that prevents paint from sticking properly.
Mix a few drops of mild dish soap into a bucket of warm water. Wipe down every wall with a sponge, starting at the top and working down. Rinse with a clean damp sponge. For kitchens or areas with heavy grease buildup, use a TSP solution instead of dish soap. TSP cuts through grease and grime that regular soap won’t touch.
Let the walls dry completely before moving to the next step. Painting or patching over damp surfaces causes adhesion problems down the line.
Inspect and Repair
Once the walls are clean, grab a bright work light and hold it at a low angle against the wall. This raking light reveals every dent, nail hole, crack, and rough patch that’s invisible under normal lighting. Mark each spot with a small piece of painter’s tape or a light pencil circle.
For small nail holes and minor dings, lightweight spackle and a putty knife are all you need. Scoop a small amount onto the knife and spread it across the hole, holding the blade at a low angle to the wall. Slightly overfill the hole because spackle shrinks as it dries. Most lightweight spackle dries in about 30 minutes to an hour.
For deeper holes (anything larger than a quarter), apply a self-adhesive drywall patch first, then spread joint compound over it in thin layers. Let each layer dry completely before adding the next. Two to three coats usually does it.
Cracks need a different approach. Hairline cracks can be filled with spackle, but longer or recurring cracks should be reinforced. Apply fiberglass mesh tape over the crack, then cover it with setting-type joint compound. Setting compound hardens through a chemical reaction rather than just drying out, which makes it much stronger and more resistant to cracking again. If your walls have paint that’s peeling off in sheets, that’s a sign of a deeper adhesion failure that needs more than just a patch.
Also check for popped nail heads or screws in drywall. If you see small circular bumps, that’s usually a fastener pushing through the surface. Drive the fastener back in slightly below the surface with a hammer or drill, then spackle over it.
Sand Everything Smooth
After all your repairs have dried, it’s time to sand. Use 120 to 150 grit sandpaper on a sanding block. Sand every patched area until it’s flush with the surrounding wall. Run your hand over each spot to check for smoothness. If you can feel an edge, keep sanding.
Beyond just the patches, lightly sand any glossy areas on the wall. Paint doesn’t bond well to slick surfaces. A quick once-over with 150 grit takes the sheen off and gives the primer something to grab onto. You don’t need to sand down to bare wall. Just enough to dull the surface.
After sanding, wipe the walls down with a damp cloth or tack cloth to remove every bit of dust. Painting over sanding dust is one of the fastest ways to ruin an otherwise good prep job.
Tape Off Trim and Edges
Apply painter’s tape along baseboards, crown molding, window trim, and door frames. Use longer continuous strips rather than short overlapping pieces. Short pieces create gaps where paint can bleed through.
Press the tape firmly with a putty knife along the edge that borders the wall. This seals the edge and prevents paint from creeping underneath. It takes an extra minute per section but makes a big difference in how clean your lines look.
Prime the Walls
Priming is the final prep step, and knowing when to prime is critical to a good result. At minimum, you should prime over every patched and sanded area. Bare spackle and joint compound absorb paint differently than the surrounding wall, which creates visible dull spots called “flashing” in the finished coat.
For best results, prime the entire wall. Use a stain-blocking primer if you’re covering water stains, smoke damage, or dark colors. Use a bonding primer if you’re painting over glossy surfaces. For standard repaints over walls in decent condition, a basic latex primer works fine.
Apply primer with a roller for large areas and an angled brush for cutting in around edges. One coat is usually enough. Let it dry completely (check the label, but most primers need at least two hours) before painting.
How Do You Prep Plaster Walls Differently Than Drywall?
Plaster walls need more careful handling than drywall. Plaster is harder and more brittle, and it doesn’t respond well to aggressive sanding or heavy-handed repairs. If you’ve got plaster walls in an older apartment, take your time with this step.
For plaster, use setting-type joint compound for repairs instead of lightweight spackle. Spackle works on drywall because drywall flexes slightly. Plaster doesn’t flex, and lightweight spackle tends to crack or pop out of plaster repairs over time. Setting compound bonds better and holds up longer.
When sanding plaster, go easy. Plaster has a smooth, hard finish that’s actually desirable. You only want to sand patched areas flush and degloss any shiny spots. Over-sanding plaster removes the hard surface coat and exposes the softer base underneath, which absorbs paint unevenly.
One thing we see constantly in older NYC apartments is multiple layers of paint built up over decades. Sometimes there are ten or fifteen coats stacked on top of each other. When the bond between layers fails, the whole stack starts to peel. In these cases, you may need to scrape back to a stable layer before patching and priming.
Drywall is more forgiving. It accepts spackle and sanding well, and repairs blend in relatively easily. The main pitfall with drywall is over-sanding, which can tear through the paper face and create fuzzy spots that show through paint. If you do tear the paper, seal it with a coat of primer before patching over it.
Do You Always Need to Prime Before Painting?
Not always, but more often than most people think. You can skip a separate primer coat only when all three of these conditions are true: the existing paint is in good shape with no peeling or flaking, you’re painting a similar or darker color over the old one, and you haven’t done any patching or sanding.
If any of those conditions aren’t met, prime. Skipping this step leads to uneven sheen, poor coverage, and a finish that wears out faster. This is especially true when you’re making a dramatic color change. Going from a dark wall to a light color without primer can take four or five coats of paint to get even coverage. A single coat of tinted primer cuts that down to two coats.
Paint-and-primer combos are popular, but they’re not a true replacement for standalone primer in situations that actually call for it. They work fine for simple repaints over surfaces in good condition. For anything involving repairs, color changes, or stain coverage, use a dedicated primer first.
What Are the Most Common Wall Prep Mistakes?
The biggest mistake is rushing through prep or skipping it entirely. We’ve walked into apartments where someone painted directly over dirty walls, nail holes, and even peeling paint. The result always looks terrible within a few months. Paint cracking as it dries is almost always a prep failure, not a paint failure.
Here are the mistakes we see most often:
Not cleaning the walls before painting. Kitchen walls especially collect a film of grease that’s invisible until paint starts sliding off.
Patching holes but not sanding them smooth. A bumpy patch is obvious once paint goes over it, especially in rooms with natural light hitting the walls at an angle.
Sanding too aggressively. This is especially common on drywall, where it’s easy to tear through the paper face, and on plaster, where you can remove the hard finish coat.
Priming only the patches instead of the whole wall. Even if the rest of the wall seems fine, patched areas absorb differently. Priming the entire surface creates a uniform base.
Taping after painting starts instead of before. Tape sticks best to clean, dry, unpainted surfaces. If paint gets under your tape line because you tried to tape mid-project, the result is a ragged, unprofessional edge.
Painting before repairs are fully dry. Spackle that looks dry on the surface can still be damp underneath, especially in thick patches. When you paint over damp filler, it can bubble, crack, or discolor.
When Should You Hire a Professional Painter?
Not every wall prep job needs a professional, but some situations make DIY risky. If your walls have widespread cracking, layers of old paint that are delaminating, or water damage, the repairs require more skill and judgment than basic spackle work.
If your apartment was built before 1978, there’s a real chance you’re dealing with lead paint underneath the surface. Disturbing lead paint through sanding or scraping creates hazardous dust that requires specific containment and cleanup procedures. This isn’t something to take chances with, especially in a home with children.
High ceilings, intricate trim work, and plaster walls with complex damage all add difficulty. The cost of hiring a professional who knows how to handle these situations is almost always less than the cost of fixing a failed DIY attempt.
We also recommend hiring a pro if you’re painting an apartment for sale or lease renewal. The standards are higher, the timeline is tighter, and a professional finish makes a measurable difference in how buyers and tenants perceive the space.
Get Your Walls Done Right the First Time
Good wall prep comes down to patience. Clean, repair, sand, prime. Do each step well, and the actual painting goes on smoothly and lasts for years. Skip any of them, and you’ll be repainting sooner than you’d like.
If you’re planning a painting project in Manhattan, Brooklyn, or Queens, Soho Painters handles every step of the process, from thorough wall prep through final inspection. We specialize in both apartment painting and interior painting for homes and offices across NYC. Reach out for a free estimate and we’ll make sure your walls are done right.