Now that paint and primer formulas are continually improving, finding out the answer of whether or not to apply primer before painting can be confusing depending on who you ask.
There was a time when every professional painter would recommend you apply a layer before painting. But now that not everyone has the time or budget to do the extra step, many would choose to skip the primer.
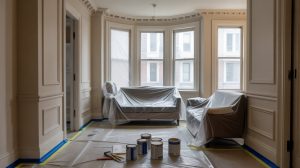
Although it can extend your project for a couple more days, there are some instances where priming your walls is necessary to get the best results. To help prevent you from making the costly mistake, below is a quick guide on when you should prime your walls.
What is primer?
Primer is a base coat that’s usually applied to prepare walls for painting. Although it looks similar to paint, it’s actually made from a different formula – where paint is pigment-based while primer is resin-based.
It’s highly recommended to apply a layer of primer when freshening up walls since it creates a stable surface to make the paint adhere better. A good quality primer can also create a sturdy barrier to keep moisture and other elements from damaging the paint.
Without it, your paint color won’t appear as even and vibrant as you’d like, and you’d run the risk of it chipping, cracking, or peeling earlier than expected.
When should you use primer on walls?
It may not be recommended to skip the step of priming your walls, but there are certain types of surfaces where you can get away with it. But if you’re working with these wall surfaces, you will need a primer to get the best results:
1. Porous surfaces
Porous wall textures, like new drywall, untreated wood, or concrete, can be challenging to paint because it soaks into the surface and make the color look uneven. Without primer, it can take you several coats of paint to get a thick and smooth layer to make your paint look decent.
But an application of good-quality primer will smooth out its texture allowing you to save time and money from applying multiple coats of paint. Besides, primer is also cheaper than paint, so it wouldn’t cost you too much to do the extra step.
2. Switching paint finishes
Similar to porous walls, paint can find it difficult to stick to smooth and glossy surfaces. If you’re planning on switching the glossy sheen of your room to a matte finish, you might want to think twice before applying the paint directly.
Since glossy paint finishes create a smooth barrier on your wall, it’s recommended to sand or scuff it to create a texture to where the paint can adhere to.
1-2 coats of primer will then ensure the gloss of the previous paint won’t peek through and make sure your new paint will stick to the surface. This trick can also work if you’re planning on painting over a semi-gloss finish with satin paint, as long as you’re switching from a glossy sheen to a less lustrous one.
3. Dark to light paint colors
Aside from paint finishes, you also need to apply primer when you’re thinking of changing your paint color from dark to light. Darker hues, like black, red, or navy blue, have the tendency to peek through pastel shades and make them look muddy.
Adding 1-2 layers of white primer between the two colors will make the transition easier. This will cover up the darker color to make the lighter hue appear more prominent.
But if you’re going from light to dark, you can also choose a primer with a similar color tint as your paint to cut down the number of coats you’ll need to apply.
4. Repatched or repaired walls
Cracks and holes on the wall can look unsightly even if you apply a fresh coat of paint over it. That’s why it’s important to cover up any damage on the surface as part of prepping your wall for painting.
But once you’ve repaired or repatched an area of your wall, it would be wise to apply a layer of primer before adding the new color. Since the spackle or joint compound can absorb the paint, making the color uneven. But before priming, also make sure to sand out any rough spots so the surface is smooth to work on.
5. Humid areas
Aside from creating a polished finish, a coat or two of primer can also provide an extra layer of protection against moisture from seeping through your walls. Since humid areas, like bathrooms and exterior walls, have higher chances of getting wet, a coat or two of primer will also stop the paint from chipping and peeling faster.
When applied properly, the primer will strengthen the bond between the paint and the wall, creating a sturdy barrier that moisture can’t get through.
How to use paint primer
To help you get an impeccable paint job, follow these steps for applying primer properly:
1. Wipe away any dust or stains from the wall with a damp cloth to ensure the primer will adhere better.
2. Repair any cracks or holes on the wall to create a smooth and sturdy surface for painting. Make sure to let the spackle or joint compound dry completely before sanding the area. Then, wipe the spot with a damp towel to remove any dust particles.
3. Once the area is dry, apply one layer of the primer. Use a brush to cut into the corners and a roller for larger areas. If you need to apply a second layer, make sure to wait until the first coat of primer is completely dry. Once you’re satisfied, you can then apply your paint color.
Need help with painting your walls?
If your walls didn’t turn out how you expected after priming, maybe it’s time to turn to the professionals. Soho Painters provides the best painting services in New York, whether you need to freshen up a residential or commercial space. From interior to exterior painting, their team is equipped with the best technology, equipment, and training to give you exceptional results. For questions or inquiries, reach out to their team now to get a free estimate of your project.