There comes a time in every home when that dated wallpaper has to go. Maybe you inherited a bold floral print from a previous owner, or you’re simply ready to refresh your space with a clean coat of paint. Either way, learning how to remove wallpaper properly is one of the most valuable DIY skills you can develop — and one of the most commonly botched.
At Soho Painters, we’ve stripped wallpaper from hundreds of homes and apartments over the years. Damaged drywall, lingering adhesive, and walls that refuse to hold paint are all avoidable problems when you use the right approach. In this guide, we’ll walk you through every step, from understanding what’s on your walls to prepping the surface for a flawless new finish.
Why Proper Wallpaper Removal Matters
Before you grab a scraper and start tearing at the edges, it’s worth understanding what’s actually holding wallpaper to your wall. Most wallpaper consists of two layers: a decorative top layer and a paper or vinyl backing that sits against an adhesive bond. That adhesive — typically a starch- or cellulose-based paste — is what makes removal tricky. Over time, especially in homes where humidity and temperature fluctuate seasonally, the adhesive hardens and bonds more aggressively with the wall surface.
The type of wall underneath matters just as much. Older homes with plaster walls are more forgiving during scraping than modern drywall. If your home was built or renovated in recent decades, you’re likely working with drywall, and aggressive scraping can tear the paper face right off the gypsum core. If you do end up with damage, you’ll want to understand the basics of repairing drywall before painting to get a smooth surface again.
Preparing Your Room for Wallpaper Removal
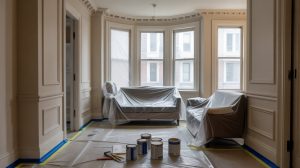
Wallpaper removal is a wet, messy process, and proper preparation will save you hours of cleanup. Start by relocating as much furniture as possible away from the walls, and cover whatever stays behind with plastic sheeting. Lay drop cloths along the baseboards, taping them securely so water doesn’t seep onto your floors.
Turn off the electricity to any outlets or switches on the walls you’ll be working on. This is non-negotiable since you’ll be applying water and steam near these fixtures. Remove the outlet and switch plate covers, and seal the openings with painter’s tape. Open windows where possible and set up a fan to keep air circulating. Good airflow is especially important if you’ll be using chemical stripping solutions, and it’s always worth being mindful of VOC exposure and indoor air quality when working in enclosed spaces.
Here are the essential tools you’ll need:
- Drop cloths and plastic sheeting
- Painter’s tape
- Wallpaper scoring tool
- Wide putty knife or six-inch broad knife
- Spray bottle or pump sprayer
- Sponges and rags
- Bucket of warm water
- Wallpaper removal solution or white vinegar
- Trash bags
The Soak-and-Scrape Method: Your Go-To Technique
For most wallpaper, the soak-and-scrape method is the most effective approach. Start by testing a small corner — peel gently to see if the wallpaper lifts on its own. Occasionally, you’ll get lucky with strippable wallpaper that peels away in large sheets, but don’t count on it, especially in older homes where previous owners may have applied wallpaper over unprimed surfaces.
If the wallpaper doesn’t peel easily, use a scoring tool to create small perforations across the surface in overlapping circular motions. Apply just enough pressure to puncture the paper without digging into the wall. These tiny holes allow your removal solution to penetrate the backing and dissolve the adhesive. Next, mix your stripping solution — either a commercial wallpaper remover, one part white vinegar to two parts warm water, or a quarter cup of fabric softener with a quart of hot water. Apply generously with a pump sprayer, working in four-foot sections, and let it soak for at least ten to fifteen minutes. Be patient — rushing this step is the single biggest mistake we see homeowners make.
Once the adhesive has softened, slide your putty knife under the wallpaper at a seam and begin peeling upward. Stubborn spots may require reapplication. After removing the paper, wipe the walls with a damp sponge to clear remaining adhesive. If your fingers glide smoothly across the surface, the paste is gone.
Using a Steamer for Stubborn Wallpaper
When soaking alone isn’t doing the job — and with decades-old wallpaper, it often isn’t — a wallpaper steamer is your best ally. Steamers use hot vapor to penetrate the paper and dissolve the adhesive bond far more effectively than water-based solutions alone. You can purchase an affordable handheld clothes steamer for smaller jobs, or rent a dedicated wallpaper steamer from your local hardware store for larger rooms.
Fill the steamer and let it heat up fully. Hold the steam pad against a section of wall for about thirty seconds, then immediately scrape the softened paper away with your broad knife. Work from the bottom of each strip upward, as steam naturally rises and continues loosening the paper above. Keep a trash can nearby since wet wallpaper adhesive sticks to everything.
One important note: steamers generate significant moisture and heat, so make sure you have adequate ventilation in the room. Avoid holding the steamer too long in one spot on drywall, as excessive moisture can soften the gypsum core and cause damage that’s difficult to repair.
Dealing with Vinyl and Painted-Over Wallpaper
Vinyl wallpaper and wallpaper that’s been painted over present unique challenges, and both are extremely common in kitchens and bathrooms. Vinyl has a water-resistant top layer that prevents moisture from reaching the adhesive beneath, which is why scoring is absolutely essential. Use your scoring tool more aggressively on vinyl — you need those perforations deep enough to let moisture pass through the waterproof barrier.
For wallpaper that someone has painted over (a shortcut we strongly advise against), the process becomes significantly more labor-intensive. The paint creates an additional seal that traps everything underneath. You’ll likely need to score heavily, apply multiple rounds of stripping solution, and use a steamer. In extreme cases, the paint-wallpaper sandwich may need to be removed in small pieces. This is one of those situations where calling in professional help is often more cost-effective than spending an entire weekend fighting stubborn walls.
Preparing Your Walls After Wallpaper Removal
Getting the wallpaper off is only half the battle. What you do next determines whether your new paint job will look professional or patchy. Inspect the walls carefully for gouges, torn drywall paper, or adhesive stains. Fill any small holes or dings with lightweight spackle, let it dry, and sand smooth. For larger areas of damage, apply a thin skim coat of joint compound to rebuild the surface.
Once repairs are dry, sanding the walls with the right grit sandpaper creates the smooth, even texture you need for paint to adhere properly. Then comes the most critical step many DIYers skip: priming. A high-quality primer seals any remaining adhesive residue, covers repairs, and creates a uniform surface for your topcoat. If you’re unsure about which situations call for it, our guide on when priming is necessary before painting breaks it down in detail. Skipping primer after wallpaper removal almost always leads to uneven sheen, stains bleeding through, and poor adhesion.
After priming, lightly sanding the primer coat ensures maximum adhesion for your topcoat. Then you’re ready to choose your new wall color. If you’re debating between a matte or satin paint finish for your newly bare walls, consider the room’s purpose and traffic level — both are excellent options depending on the space.
When Things Go Wrong
Even with careful technique, problems can arise. If the drywall paper face is tearing as you scrape, you’re applying too much pressure or the wall wasn’t primed before installation. Stop scraping and apply more solution to soften the adhesive further. For adhesive that won’t budge, switch from a vinegar solution to a commercial remover — professional-grade products contain enzymes formulated to break down stubborn paste bonds.
If the walls feel rough and tacky even after cleaning, there’s still residue present. Go over the surface again with hot water and a sponge, or try trisodium phosphate (TSP) mixed with warm water. Never paint over residual adhesive — it will cause your new paint to bubble and crystallize within weeks.
Ready for a Fresh Start? Let Us Help
Removing wallpaper is a rewarding project, but it’s also one of the most time-consuming tasks in home renovation — especially when dealing with multiple layers or delicate older walls. If you’d rather skip the hassle, Soho Painters is here to help.
Our team handles everything from wallpaper removal and wall repair to professional interior painting and expert wallpaper installation. Whether you’re refreshing a single room in your apartment or transforming an entire home, we bring the experience and attention to detail that turn bare walls into something beautiful. Get in touch with us today for a free estimate.