When it comes to painting wood surfaces in your home or office, choosing the right finish can make all the difference between a mediocre result and a professional-looking outcome. As experienced painters who have worked on countless wooden surfaces across New York City, we’ve found that eggshell paint offers an excellent balance of aesthetics and durability. This versatile finish has become increasingly popular among our clients, and for good reason – it provides a sophisticated look while offering practical benefits that make it perfect for wood surfaces.
In this comprehensive guide, we’ll walk you through everything you need to know about applying eggshell paint to wood, from preparation to final touches. Whether you’re refinishing furniture, updating trim, or tackling wooden doors, understanding the proper techniques will help you achieve results that look professional and last for years to come.
Understanding Eggshell Paint
Before diving into the application process, it’s crucial to understand what makes eggshell paint unique. Named for its resemblance to the subtle sheen of an actual eggshell, this finish sits perfectly between flat and satin on the glossiness scale. With years of experience in commercial and residential painting, we can confidently say that eggshell paint offers several distinct advantages when used on wood surfaces.
The slight sheen of eggshell paint helps highlight the natural beauty of wood while providing better durability than flat finishes. Unlike high-gloss options that can make imperfections glaringly obvious, eggshell paint tends to be more forgiving while still offering enough reflection to add depth to your painted surface. This makes it particularly suitable for areas that require regular cleaning without the stark shininess of semi-gloss finishes.
Key benefits of using eggshell paint on wood:
- Provides excellent hide and coverage while allowing subtle wood texture to show through
- Offers better stain resistance than flat finishes, making it ideal for frequently touched surfaces
- Creates a sophisticated look that works well in both traditional and modern settings
- Allows for easier touch-ups compared to glossier finishes
Preparation is Key
The success of any painting project largely depends on proper preparation, and this is especially true when working with wood surfaces. We’ve learned through extensive experience that taking the time to prepare your surface properly will significantly impact the final result and longevity of your paint job.
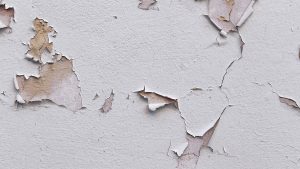
Start by thoroughly cleaning the wood surface to remove any dirt, grease, or debris. For previously painted surfaces, you’ll need to assess whether you need to remove the old finish. This is particularly important when working with different paint sheens. When painting over an existing glossy finish, proper surface preparation becomes even more critical.
The next crucial step is sanding. Using the right grit sandpaper for your specific situation makes a significant difference in the final outcome. Start with a medium-grit sandpaper to remove any rough spots or old finish, then progress to finer grits for a smooth surface. Remember to sand in the direction of the wood grain to avoid creating visible scratches.
Environmental conditions play a vital role in the success of your painting project. We recommend:
- Working in temperatures between 50-85°F
- Maintaining relative humidity below 85%
- Ensuring proper ventilation throughout the process
- Avoiding direct sunlight on the surface while painting
Application Process
Having prepared countless wooden surfaces for painting, we’ve developed a foolproof application process that ensures excellent results. The key to success lies in using the right tools and techniques while maintaining patience throughout the process.
Start by gathering your materials:
- High-quality brushes and/or rollers specifically designed for eggshell finishes
- Paint trays and liners
- Painter’s tape
- Drop cloths
- Stir sticks
- Clean rags
When it comes to application technique, consistency is crucial. Start with a thin, even coat rather than trying to achieve full coverage in one thick layer. Work in manageable sections, maintaining a wet edge to avoid lap marks. For larger flat surfaces, use a foam roller designed for smooth finishes, while a high-quality brush works best for edges and detailed areas.
Most wood surfaces will require at least two coats of eggshell paint for optimal coverage and durability. Allow adequate drying time between coats – typically 4-6 hours in ideal conditions, though we recommend checking the manufacturer’s specifications. Lightly sand between coats using fine-grit sandpaper to ensure a smooth finish and proper adhesion of subsequent layers.
Common Challenges and Solutions
Even with proper preparation and technique, you may encounter certain challenges when applying eggshell paint to wood. Understanding these potential issues and knowing how to address them can save you time and frustration.
One common challenge is brush marks or roller stipple showing in the final finish. To minimize this, maintain a wet edge while painting and avoid overworking the paint. If you notice uneven sheen or flashing, this often indicates inconsistent application or improper surface preparation. When spots appear shinier than others, it usually means the paint was applied too thickly in those areas.
Temperature and humidity can significantly impact your results. High humidity can extend drying times and affect the final appearance, while low humidity might cause the paint to dry too quickly, leading to brush marks and poor leveling. We always recommend checking weather conditions and planning your project accordingly.
Maintenance and Care
Proper maintenance of your eggshell-painted wood surfaces will ensure their beauty and durability for years to come. The slightly higher sheen of eggshell finish compared to flat paint makes it easier to clean, but proper technique is still important to avoid damaging the finish.
For regular cleaning, use a soft, damp cloth with mild soap if needed. Avoid harsh chemicals or abrasive cleaning tools that could scratch or dull the finish. When it comes to touch-ups, proper preparation of the area is crucial for achieving an invisible repair. We recommend keeping some of the original paint for touch-ups, as matching sheen and color later can be challenging.
Professional Tips and Best Practices
Through our extensive experience in commercial and residential painting projects, we’ve developed several professional tips that can help ensure success:
- Always test your paint on a small, inconspicuous area first to ensure proper adhesion and desired appearance
- Use high-quality brushes and rollers – they may cost more initially but provide better results and last longer
- Consider using a paint conditioner or extender in warm conditions to improve workability
- Clean tools thoroughly between coats to prevent dried paint particles from affecting the finish
When working on larger projects or areas requiring a particularly professional finish, consider consulting with experienced painters. Professional expertise can make a significant difference in achieving the best possible results, especially for complex or high-visibility areas.
Conclusion
Successfully applying eggshell paint to wood surfaces requires attention to detail, proper preparation, and the right techniques. While it may seem daunting at first, following the steps and guidelines we’ve outlined will help you achieve professional-looking results that will last for years to come.
Remember that patience is key throughout the process – from proper surface preparation to allowing adequate drying time between coats. If you’re tackling a significant painting project or feel uncertain about achieving the desired results, don’t hesitate to reach out to professional painters who can help ensure your vision becomes reality.
Whether you’re updating a single piece of furniture or renovating an entire space, choosing eggshell paint for your wood surfaces can provide the perfect balance of durability and aesthetic appeal. With proper application and maintenance, your painted surfaces will continue to look beautiful while standing up to daily wear and tear.
Need help with your wood painting project? At Soho Painters, we specialize in interior painting and commercial painting services across New York City. Whether you’re updating your office space or refreshing your apartment’s woodwork, our experienced team can help you achieve the perfect eggshell finish. Contact us today to discuss your project and get a professional consultation.


